}:O)
DC's Custom Xnews Icons
Resource Editing Tutorial
Step 2 - Editing The Icons
Before we can merge our spool icons with our newly extracted toolbar bitmap, we need to convert the *.ico files to *.bmp format. For this procedure, we will need to use SnIco Edit. toolbox »
- Open spool1.ico in SnIco Edit;
- From the File menu, select Export > To bitmap...;[1]
- Save the file to your working directory as spool1.bmp;
- Repeat the above steps for spool2.ico.

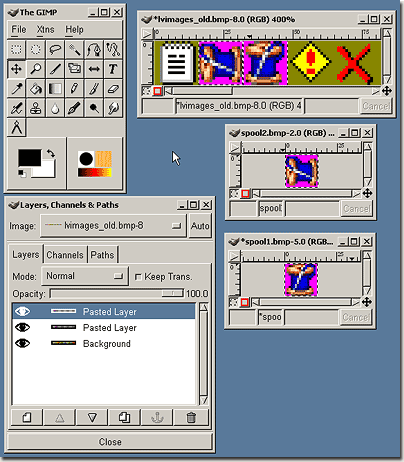
You should now have the following three (3) files in your working directory: lvimages_old.bmp, spool1.bmp and spool2.bmp. Now, we will put this puzzle together using The GIMP. toolbox »
- Open your three new *.bmp files with The GIMP;
- Change the lvimages_old.bmp to RGB colour mode (alt-r) and save it as lvimages_new.bmp;[2]
- Copy and paste spool1 and spool2 into the lvimages document as new layers;
- Use the Move Tool to position the spool layers properly overtop the old folder style icons;[3]
- Perform Layers > Flatten Image;
- Convert the lvimages document back to indexed colour mode (alt-i);
- Set the transparent colour of the new image to
 #848400 by doing the following:
- Select > By Colour... (threshold fuzziness=0) an area of the original image that you know to be #848400;
- Select > Invert to invert the selection; and
- With the Pencil Tool (brush size 1px, colour #848400), paint all selected areas which should be transparent.[4]

- Save your work as lvimages_new.bmp.
Alright kids, the worst is now behind you! Just one more step before you can play... }:O)
Notes:
[1] When prompted for a colour to represent transparency, make absolutely certain that you select a colour that does not exist in your icon image.
[2] The spool icons are already in RGB mode. Indexed colour bitmaps are less flexible to work with and do not support multiple layers, which is essential to our activities.
[3] I find it helpful to position guides at 16px intervals to aid in aligning different elements. Guides can be dragged into place by clicking and dragging the mouse pointer from the rulers that border the document window. Also, the arrow keys can be used for fine adjustments to layer position (with the move tool selected).
[4] The colour ![]() #848400, as ugly as it is, it the colour representing transparency
within the Xnews executable. Any pixels not of this *exact* colour will
not be transparent. Therefore, be diligent in inspecting the
entire bitmap for stray pixels which, if not corrected, will make your
icons look sloppy.
#848400, as ugly as it is, it the colour representing transparency
within the Xnews executable. Any pixels not of this *exact* colour will
not be transparent. Therefore, be diligent in inspecting the
entire bitmap for stray pixels which, if not corrected, will make your
icons look sloppy.